Key Takeaways:
- The search bar makes it possible to find the apps, files, and folders quickly.
- Search issues are frequently experienced by users who upgraded from Windows 10.
- Often, a quick restart is the simplest solution to the search issue.
Windows 11 included a different search bar in the Start menu as well. However, the traditional search option still exists on the taskbar. It can get challenging to look for files and apps when Windows 11 search is not working. You can use the alternative options to search for files and apps, but those are not convenient and may take more time.
The search not working issue can be a temporary bug on your Windows 11 computer or something severe. The cause of this issue is not known, and therefore you may need to perform a bunch of fixes to resolve it. Just like the Start menu is not working, the search bar may stop working out of nowhere.
18 Solutions To Fix Windows 11 Search Not Working
The solutions listed below can help you fix the search not working issue on your Windows 11 PC. If the search bar is not enabled or slow, the fixes will help you fix that as well. You may need admin rights for some of the fixes, so it is better to log in via the Admin account and perform the fixes.
1. Restart Windows Computer
Sometimes, a temporary bug can get in the way of your search bar. A quick restart can help you fix the Windows 11 search not working issue, as it will restart all the processes on your Windows 11 computer.
Press the Windows key from the keyboard or Start button on your taskbar to open the Start menu.
Click on the “Power icon” on the Start menu and select the “Restart” option to reboot your computer.
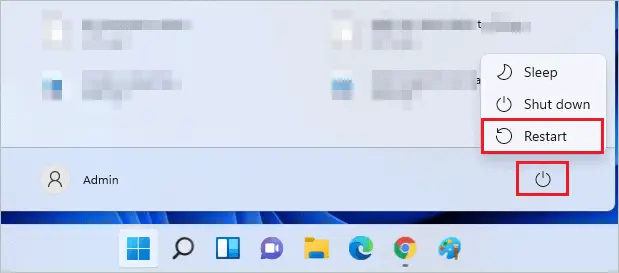
After the PC restarts, check if you can search successfully without any issues.
2. Enable Search on Taskbar
If you don’t see the search icon on the taskbar, it is probably because it is not enabled in the taskbar settings. You can follow the steps below to fix Windows 11 search not working issue and enable search in the Windows Settings app.
Step 1: Press Windows key + I to open the “Settings app” and go to “Personalization” from the left panel in the Settings menu.
Step 2: Click on the “Taskbar” in the Personalization settings.
Step 3: Toggle the switch next to “Search” to enable it on the taskbar.
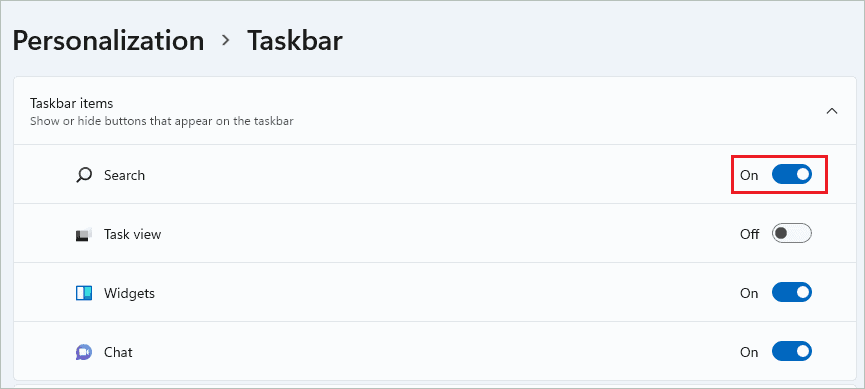
The search icon will be immediately seen on the taskbar.
3. Check the Free Space on System Drive
At times there might be Windows 11 search not working issue if you don’t have enough space on your system drive. For example, the search can get slow if the system drive, Local Disk C, does not have at least 30 GB of free space.
Press Windows key + E to open “File Explorer” and go to “This PC” from the left panel. Check the free disk space below Local Disk (C:) to know if you have enough.
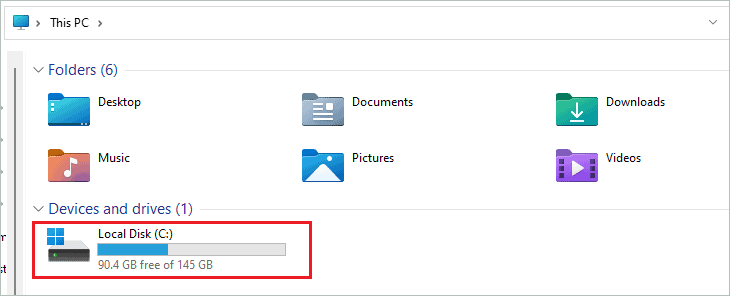
If there is not enough disk space, you can delete large files from your computer. This will resolve the Windows 11 search bar not working problem on your computer.
4. Run Search and Indexing Troubleshooter
Windows built-in troubleshooter can help you resolve many issues on your computer. For example, you can run Search and Indexing troubleshooter to fix Windows 11 search not working issue.
Step 1: Launch the Settings app and go to the “System” section.
Step 2: Click on “Troubleshoot.”
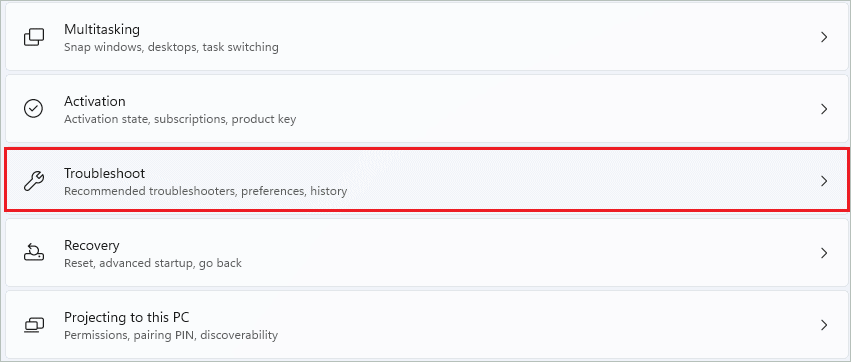
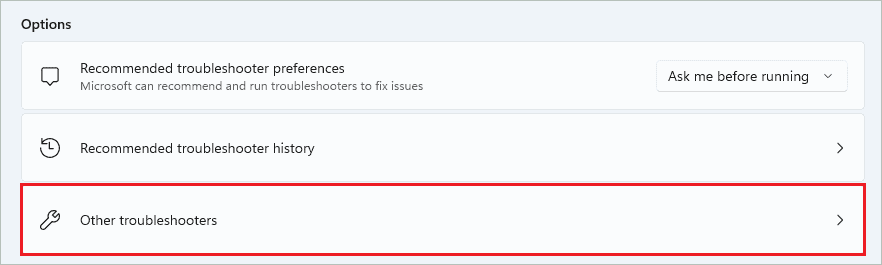
Step 3: Next, click on “Other troubleshooters”
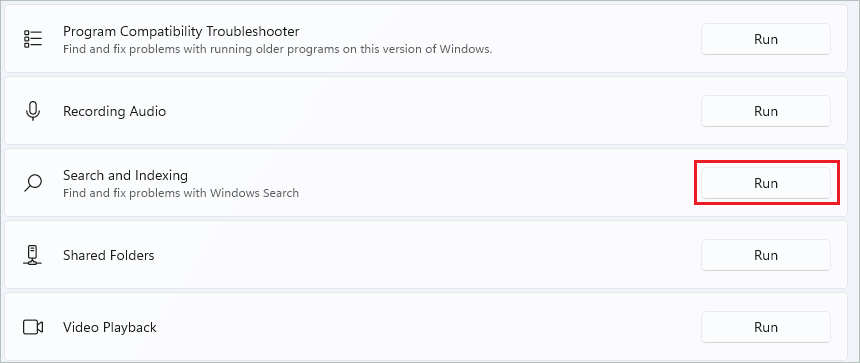
Step 4: Search for “Search and Indexing” and then click on the “Run” button next to it to run the troubleshooter.
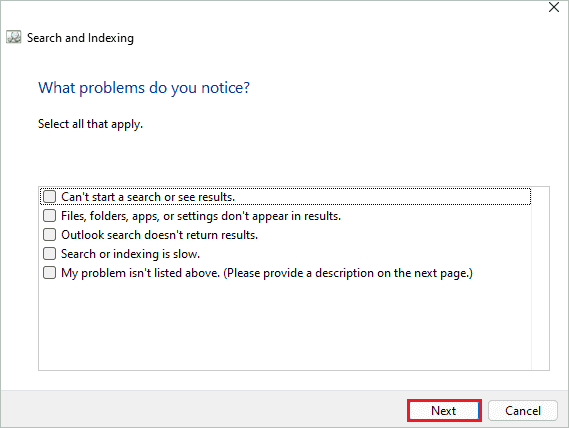
Step 5: When the troubleshooter window opens, select the issue you face with the Start menu and click on the “Next” button.
You can then follow the instruction wizard on your screen to complete the troubleshooting steps and get the Start menu working again.
5. Open the Run Dialog Box
This fix may sound weird, but it helped many Windows 11 users fix their Start menu. You can simply press Windows key + R to open the Run window and then close it without doing anything. It will resume the search and fix Windows 11 search not working issue for you.
6. Set Windows Search Service as Automatic
If the Windows Search service does not start after the system starts, you can experience problems with your search bar. You can set the Windows Search service to start automatically.
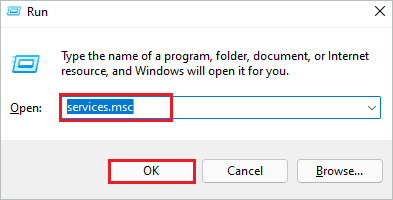
Step 1: Press Windows key + R to open the “Run” window and type “services.msc” there. Click “OK” to press the “Enter” key to open the “Services” app.
Step 2: Search for the “Windows Search” service in the Services app.
Step 3: Double-click on the service to open the properties window when the service is found.
Step 4: In the Windows Search Properties window, go to the “General” tab and set the Startup type as “Automatic” from the drop-down menu.
Step 5: Click “Apply” and “OK” to save the changes
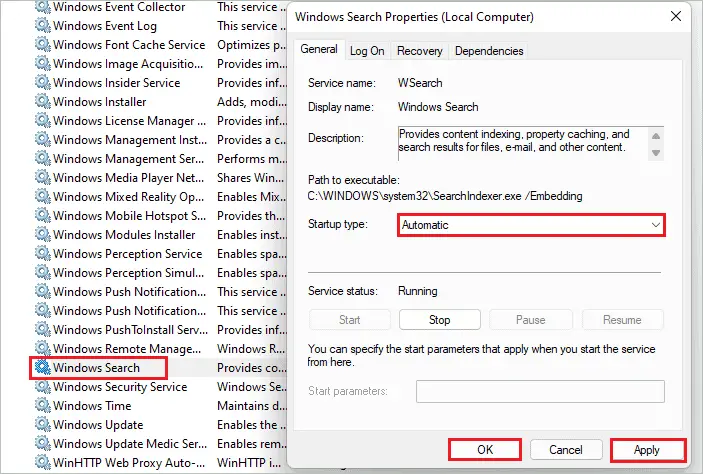
Close the Services window and restart your computer. After the PC reboots, you can check if the Windows 11 Start menu not working issue is resolved or not.
7. Check the Internet Connection
If your Windows 11 search is not working and is not showing web results, there might be some issues with your Internet. You can perform a search on your browser to check if the Internet connection is active or not. If you can carry on the search without any issues, there might be some other problems with Windows 11 search. Then, you can perform the solutions given below to fix it.
8. Restart the SearchIndexer.exe
The temporary bug in the processes can cause issues with your search bar. However, you can restart the SearchIndexer.exe process to resolve the Windows 11 search not working issue.
Step 1: Press Ctrl + Shift + Esc keys simultaneously to open “Task Manager” on your PC.
Step 2: In the Task Manager window, go to the “Details” tab and search for “SearchIndexer.exe.”
Step 3: When found, right-click on it and select “End task” from the context menu.
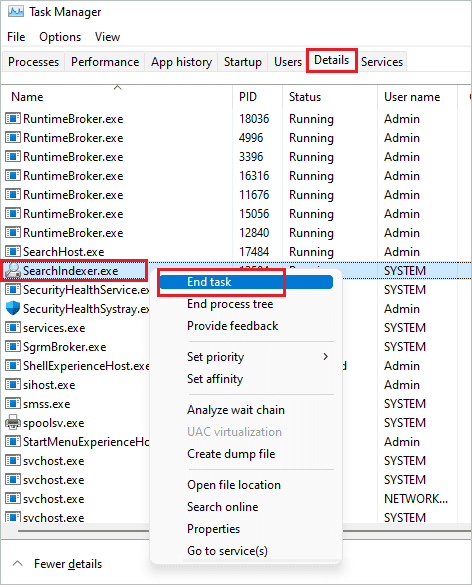
You don’t need to start the task manually; simply clicking the search icon on the taskbar will start the process. If the SearchIndexer.exe does not start on its own, you can reboot the PC to start it.
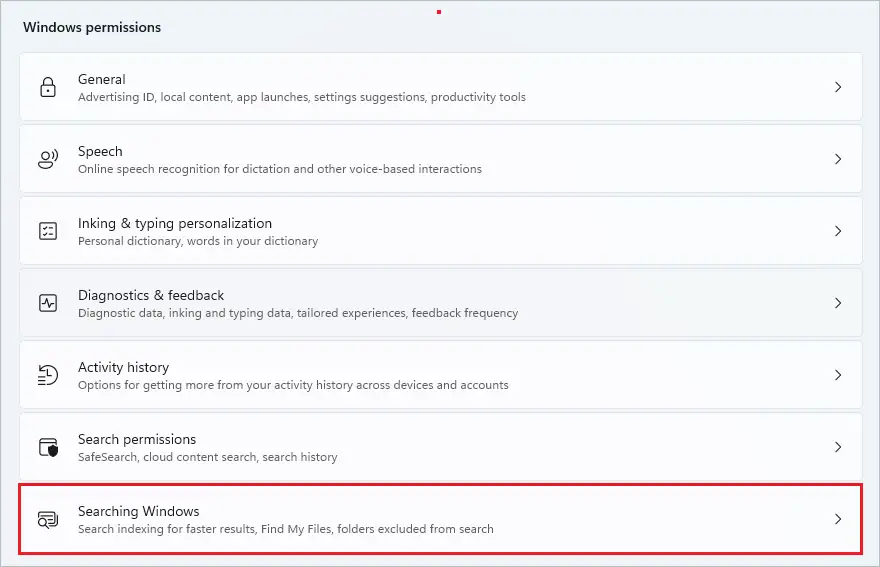
9. Make Changes to Search Settings
If you are facing Windows 11 search not working issue and cannot see items from specific folders, you can modify the search settings. Follow the steps below to make the right changes to the search bar setting.
Step 1: Open the Settings app and go to the “Privacy & security” section.
Step 2: Click on “Searching Windows” in “Windows permissions.”
Step 3: Select “Enhanced” below “Find my files” to search the entire PC.
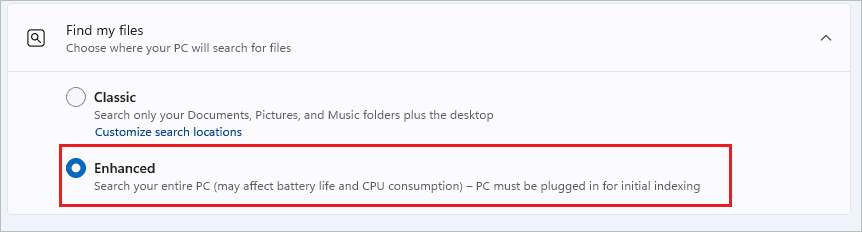
Step 4: Under “Exclude folders from enhanced search,” you can add and remove the folders to exclude from the enhanced search.
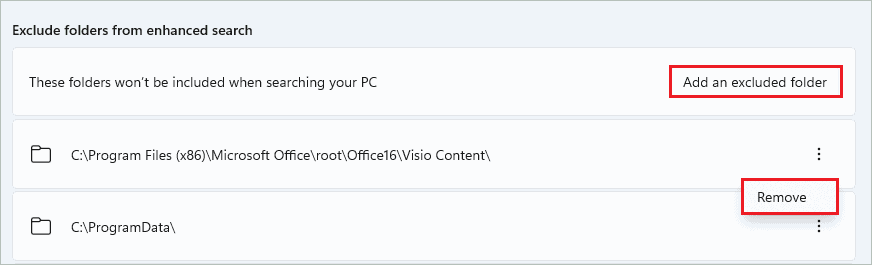
You can now perform the search and check if your search results show what is needed.
10. Update Windows 11 Operating System
You can update your PC to fix Windows 11 search not working issue.
Launch the Settings app and go to the “Windows Update” section. Next, click on the “Check for updates” button to download and install the currently available update.

After updating the PC, press Windows key + S and search for any app, file, or folder. If you are getting the desired search result, the update resolved the issue for you.
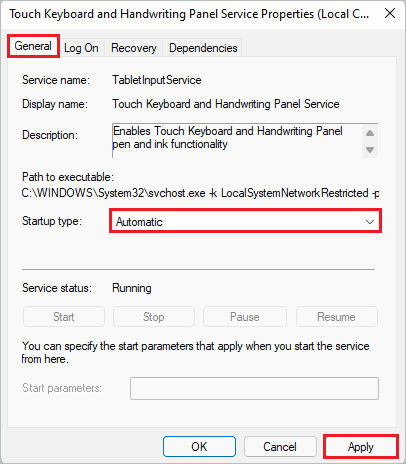
11. Modify Touch Keyboard and Handwriting Panel Service
If Windows 11 search is not working only when you are using the on-screen keyboard, you need to make changes to Touch Keyboard and Handwriting Panel Service.
Step 1: Open the Services app via the Run window.
Step 2: In the Services window, search for Touch Keyboard and Handwriting Panel Service and double-click on it to open its Properties window.
Step 3: In Touch Keyboard and Handwriting Panel Service Properties dialog box, go to the “General” tab and change the Startup type to “Automatic.”
Step 4: Click on “Apply” to save the changes.
Step 5: Now, go to the “Recovery” tab and select “Restart the Service” for the “Subsequent failures” option.
Step 6: Change the “Reset fail count after” to “0.” Click on “Apply” followed by “OK.”
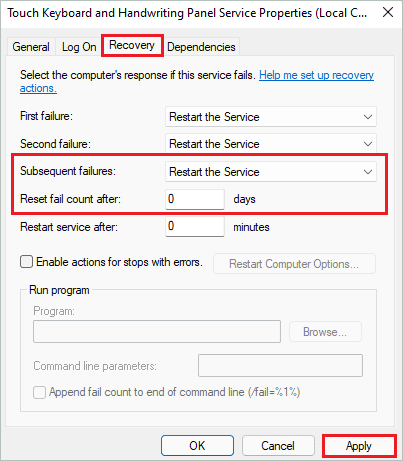
Close the Services app and check if the search bar starts working with the on-screen keyboard or not.
12. Perform SFC and DISM Scan
The Windows 11 search is not working because of corrupted system files. However, you can perform SFC (System File Checker) and DISM (Deployment Image Servicing and Management) scans to repair corrupt files on your computer.
Step 1: Open Run and type “cmd” there. Press Ctrl + Shift + Enter to open “Command Prompt” with administrator access.
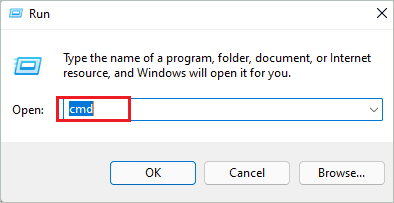
Step 2: Type the sfc /scannow command in the Command Prompt and press the “Enter” key to execute it.
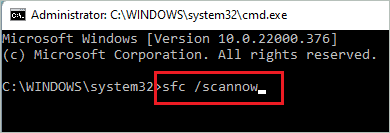
Step 3: Once the sfc command is executed, run the DISM scan by executing the below command.
DISM /Online /Cleanup-Image /RestoreHealth
The command execution may take some time. Once the command is executed, close the Command Prompt and reboot your computer.
13. Delete Temp Search Data
If the search data is corrupted, you can experience issues with the search bar. You can delete temporary search data and check if it helps in resolving the problem.
Press Windows key + E to open “File Explorer” and navigate to the below-mentioned path.
C:\ProgramData\Microsoft\Search\DataIn the Data folder, there will be an Application and Temp folder. Open the Temp folder and delete its content.
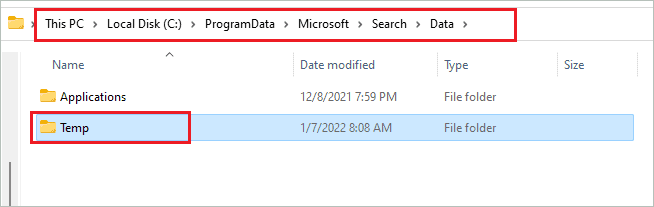
If you don’t wish to delete the Temp folder’s content, you can move its content to some other folder on Desktop or other drives.
Once done, reboot your PC and check if Windows 11 Start menu not working issue is resolved or not.
14. Roll Back or Uninstall Recent Windows Update
If you started experiencing issues and face Windows 11 search not working issue after updating your PC, you could roll back to the previous version.
Step 1: Go to Settings app ➜ Windows Update.
Step 2: Click on “Advanced options.”
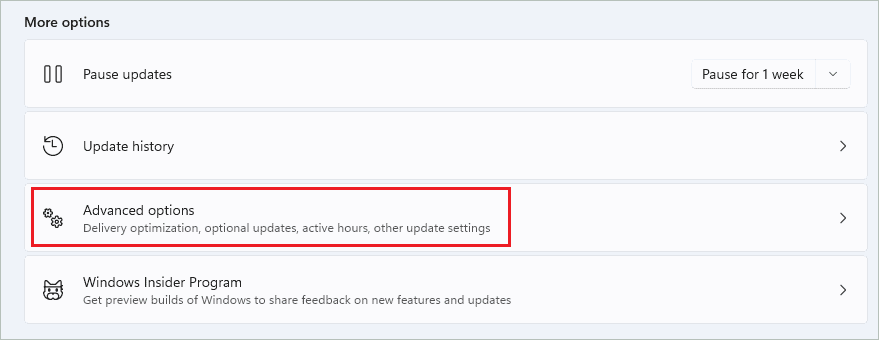
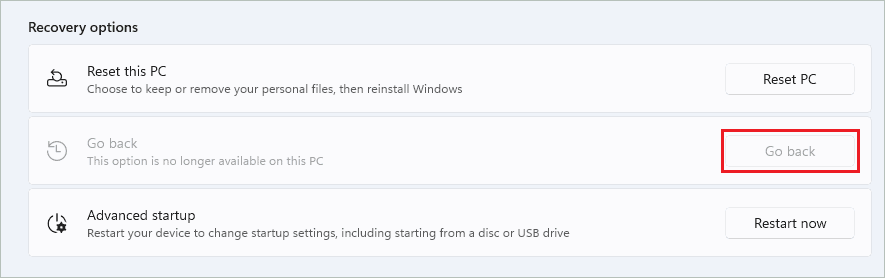
Step 3: On the next window, click on “Recovery.”
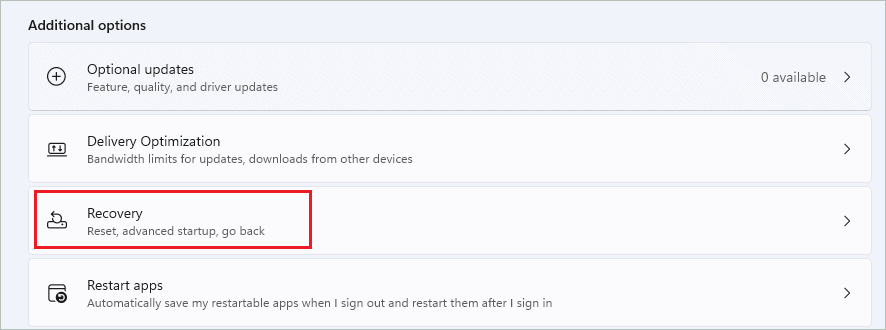
Step 4: Click on the “Go back” button under Recovery options. If it is disabled, 10 days have passed since the update, and you need to perform some extra steps to remove the update from your PC. You can follow the below steps if the Go back button is grayed out.
However, if the Go back button is enabled, you can click on it and roll back by following the instruction wizard.
Step 5: Go back to the Windows Update page and click on “Update history.”
Step 6: On the next screen, scroll down and click on “Uninstall updates.”
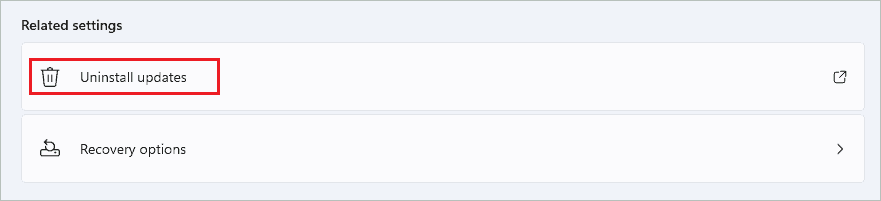
Step 7: When the Control Panel window opens, right-click on the recent update and click “Uninstall.”
If you are not sure about the recent update, check the “Installed On” column.

Once the update is uninstalled, check if you can perform a search easily or not.
15. Rebuild the Windows Search Index
You can rebuild search index to fix Windows 11 search not working issue. Follow the steps below to rebuild the search index.
Step 1: Go to Settings app ➜ Privacy & security and click on “Searching Windows.”
Step 2: Click on “Advanced indexing options.”
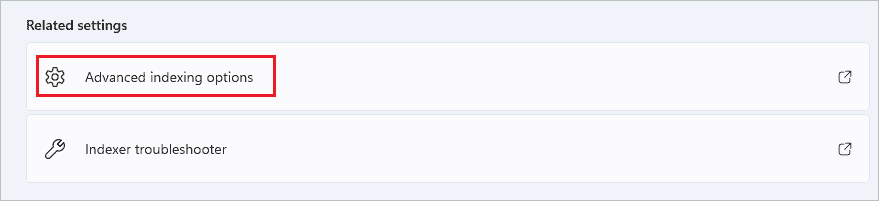
Step 3: When the Indexing Options window pops up, click on the “Advanced” button.
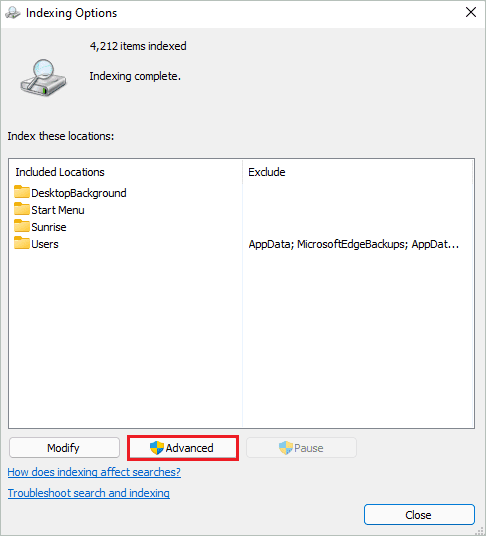
Step 4: On the Advanced Options window, click on “Rebuild” in the Troubleshooting section.
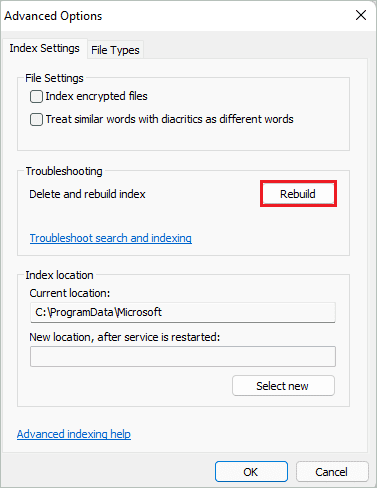
Windows will rebuild the search index for you on its own. You can then search for anything on your Windows 11 PC.
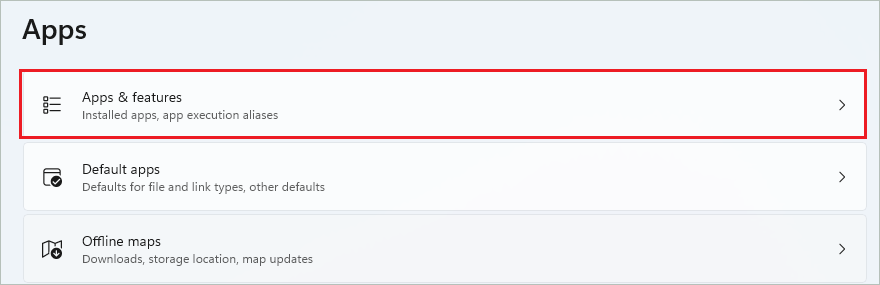
16. Reset Cortana
If you are not able to perform a search via Cortana, you can reset this feature via the Settings app. This can help you fix Windows 11 search not working.
Navigate to Settings app ➜ Apps and click on “Apps & features.”
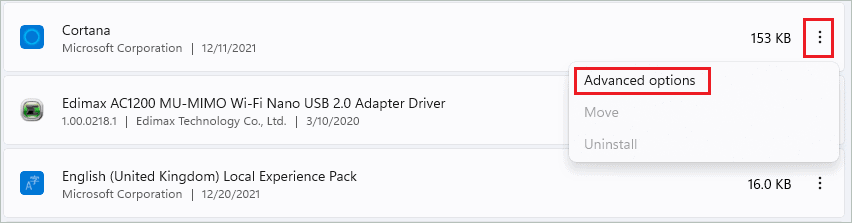
Search for Cortana and click on the 3-dots next to it. Then, click on the “Advanced options.”
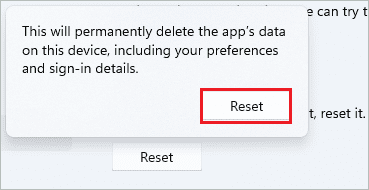
Scroll down to “Reset” and click on the “Reset” button on the next screen.
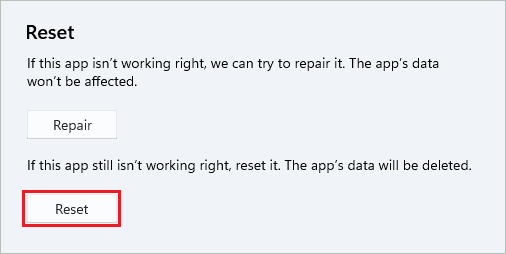
When asked for confirmation, click on the “Reset” option.
You can launch search again by pressing Windows key + S and check if it is working normally.
17. Remove Bing from Search
You can remove Bing results from the search to fix Windows 11 search not working. This will fix the problem, but you will miss out on web search until Bing search is disabled. You can only proceed if you are okay with no web results in your search.
Before you proceed with the steps, back up your registry so that it can be used to restore it if required.
Step 1: Open Run and type “regedit” there. Click OK to open “Registry Editor.”
Step 2: In the Registry Editor, navigate to the below path.
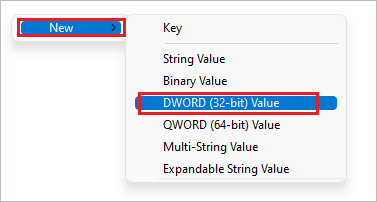
Computer\HKEY_CURRENT_USER\Software\Microsoft\Windows\CurrentVersion\SearchStep 3: Right-click on the empty space in the right frame of the Windows Registry Editor and select New ➜ DWORD (32-bit) Value from the context menu.
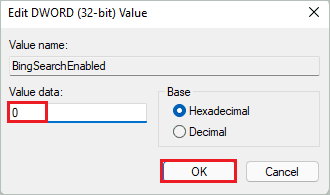
Step 4: Name the DWORD as “BingSearchEnabled.”
Step 5: Double-click on “BingSearchEnabled” and change its “Value data” to “0.” Then, click “OK” to save the changes.
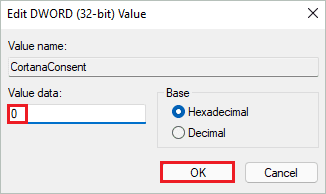
Step 6: Now, search for the “CortanaConsent” value and double-click on it.
Step 7: Change the Value data of CortanaConsent to “0.”
Close the Registry Editor and reboot your PC. After the PC reboots, check if the search issue is resolved or not.
18. Reset the Windows 11 PC
The last option to fix the Windows 11 search not working is to reset or refresh your PC. The reset process reinstalls Windows without any installation media. You can reinstall Windows without losing any personal files or data.
The settings will be restored to factory default, and the apps that were installed will be removed. Only the apps that came along with your PC will be present after the reset.
Final Thoughts On Windows 11 Search Not Working
It becomes difficult to search for files, folders, and apps if you face Windows 11 search not working issue. Many Windows 11 users had issues with the search bar initially. However, this issue can be easily resolved with some fixes here and there. The above solutions can help you get the search bar working again in Windows 11.
However, the solution that may work for you may not work with other users with the same issues. Therefore, you can try the solutions in chronological order until you find the one that works for you.
FAQs
How do I enable the search in Windows 11?
You can go to Settings app ➜ Personalization ➜ Taskbar and toggle the switch next to Search to enable the search icon on taskbar in Windows 11.
Why does Windows 11 take so long to search?
The temp search data might be full, or there might be some issue with search processes on your Windows 11 PC. In addition, there are many other unknown reasons for Windows 11 to take a long to perform the search.
Why can’t I type in the search bar in Windows 11?
It can be because of keyboard issues or an on-screen keyboard process. But, again, several known and unknown issues can cause typing problems in the search bar in Windows 11.


